sudo mariadb -e 'CREATE DATABASE dbname'
sudo mariadb -e 'CREATE USER username IDENTIFIED BY "thePassword"'
sudo mariadb -e 'GRANT ALL ON dbname.* TO username'
sudo mariadb -e 'FLUSH PRIVILEGES'Setting up a web server on debian 9 (LAMP)
Apache2
sudo apt-get update
sudo apt-get install apache2
netstat -tulpn
MariaDB
sudo apt-get update
sudo apt-get install mariadb-server
sudo mysql_secure_installation
sudo systemctl status mariadb
sudo mysqladmin version
PHP
sudo apt-get install php libapache2-mod-php php-mysql
php -vscp – copying files to remote server via ssh
scp -P 14550 -r /home/user/Downloads/testdirectory user@remotehost:/home/user/targetdir
scp -P 14550 -r /home/user/Downloads/testdirectory user@remotehost:"/home/user/targetdir\\ with\\ spaces"Setting up secure SSH server on Debian 9
adduser jonas
echo "jonas ALL=(ALL) NOPASSWD: ALL" >> /etc/sudoers
echo "AllowUsers jonas" >> /etc/ssh/sshd_config
sed -i 's/PermitRootLogin yes/PermitRootLogin no/g' /etc/ssh/sshd_config
sed -i 's/Port 22/Port 36478/g' /etc/ssh/sshd_config
ssh-copy-id jonas@remotehost
sed -i 's/#PasswordAuthentication yes/PasswordAuthentication no/g' /etc/ssh/sshd_config
service ssh restart
sudo passwd -l rootSet NUMLOCK ON as default on login screen – Ubuntu 18.04
sudo apt-get update
sudo apt-get -y install numlockx
No further configuration needed, just reboot and thats it
Setup L2TP over IPsec VPN client on Ubuntu 18.04 using GNOME
Install network-manager-l2tp
sudo apt-get update
sudo apt-get install network-manager-l2tp
sudo apt-get install network-manager-l2tp-gnome
Set VPN properties via GUI
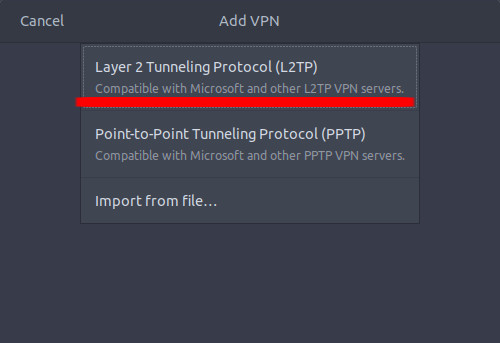
Navigate to Settings > Network > VPN > +

Select Layer 2 Tunneling protocol (L2TP)
Enter:
VPN Name, Gateway (domain name or IP),
User name,
NT Domain (in my case this is Active Directory domain name)

Choose IPsec settings,
check Enable IPsec tunnel to L2TP host,
enter your pre-shared key,
enter 3des-sha1-modp1024 as Phase1 Algorithms,
enter 3des-sha1 as Phase2 Algorithms

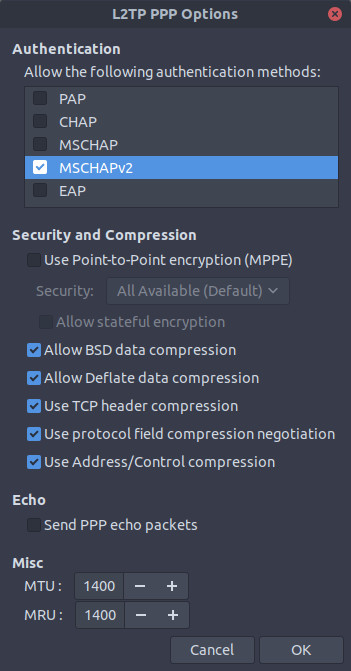
Set PPP options according to your VPN server configuration. Mine looks like this:
Last thing is to make sure your local network is L2TP pass-through and IPsec pass-through and thats it, ready to go!
Stop asking for password when using sudo – Ubuntu 18.04
sudo visudo                         # to open /etc/sudoers file in edit mode
username ALL=(ALL) NOPASSWD: ALL # add this line to the end of the fileFile permissions and ownership
Listing files and permissions
ls -al                       # list files and display permissions
ll                           # list files and display permissions
stat -c '%A %a %n' *         # list files and display permissions in decimal
find . -printf "%m %p\n      # recursively list files and permissions in decimal
du -sh ./*                   # list directory contents with sizes in M, G
Setting permissions
chmod 755 dirname            # set directory permissions
chmod 644 filename           # set file permissions
find . -type d -exec chmod 755 {} \;  # recursively set directory permissions
find . -type f -exec chmod 644 {} \;  # recursively set file permissions
chmod u+w filename           # give owner permission to write to file
chmod g+w filename           # give group permission to write to file
chmod o+w filename           # give group permission to write to file
chmod a+w filename           # give everybody (u, g, o) permission to write to file
chmod g+x filename           # give group permission to execute file
chmod ugo+rwx filename       # give read write execute permissions to owner group others
chmod -R g+r directory       # recursively give directory read permission to group
chmod -R g-r directory       # recursively remove directory read permission from group
chmod -R g=r directory       # recursively set group permission only to read
chmod o-rwx file             # removes all permissions from others
Ownership
chown root filename          # change file owner to root
chown root dirname           # change directory owner to root
chown -R root dirname        # change directory owner to root recursively
chown root:user filename     # change file owner to root ant group to user
chown -R root:user dirname   # recursively change directory owner to root and group to user
chown :user filename         # set filename group to user
chgrp user filename          # set filename group to user
chgrp user dirname           # set dirname group to user
chgrp -R user dirname        # set dirname group to user recursively

chown -v -R root:user filename            # execute chown command and display results
chown --reference=file1 file2             # copy ownership properties from file1 to file2
chown --from=guest user filename          # set file owner to user if file is owned by guest
chown --from=:guest :user filename        # set file group to user if file belongs to group guest
chown --from=root:user user:root filename # set ownership to user:root if currently ownership is root:userSearch using find command
find -name apache.log                 # search for a file
find . -name apache.log               # search for a file
find . -type f -name apache.log       # search for a file
find . -type f -iname apache.log      # case insensitive search for a file
find -type d -name snap               # search for a directory
find . -type d -name snap             # search for a directory
find . -type d -iname snap            # case insensitive search for a directory
find . -type f -name '*.txt'          # search for txt files
find . -type f -perm 0644             # search for files with 0644 permissions
find . -type f ! -perm 0644           # search for files without 0644 permissions
find . -type f -perm 2644             # search for SGID files wifh 644 permissions
find . -type f -perm 1551             # search for sticky bit files with 551 permissions
find . -type f -perm /u=s             # search for SUID files
find . -type f -perm /g=s             # search for SGID files
find . -type f -perm /u=r             # search for read-only files
find . -type f -perm /a=x             # search for executable files
find . -type f -empty                 # find empty files
find . -type f -name '.*'             # find hidden files
find . -type f -user jonas            # find files whose owner is jonas
find . -type f -user jonas -name vi   # find file vi whose owner is jonas
find . -type f -group jonas           # find files whose group is jonas
find . -type f -group jonas -name vi  # find file vi whose group is jonas
find . -type f -mtime 10              # find files last modified within 10 days
find . -type f -atime 10              # find files last accessed within 10 days
find . -type f -mtime +3 -mtime -7    # find files last modified 3 and 7 days ago
find . -type f -cmin -10              # find files last changed within last 10 minutes
find . -type f -mmin -10              # find files last modified within last 10 minutes
find . -type f -amin -10              # find files last accessed within last 10 minutes
find . -type f -size 5M               # find files whose size is more than 5 MB
find . -type f -size +5M -size -10M   # find files whose size is between 5 and 10 MB
find . -size +10M -exec rm -rf {} \;                   # delete files whose size is greater than 10MB
find . -type f -name *.jpg -size +2M -exec rm {} \;    # delete jpg files whose size is greater than 2 MB
find . -maxdepth 1 -type f -mtime +10                  # ignoring sub directories find all files last modified more than 10 days ago
find . -type f -exec grep -H 'text-to-find' {} \;      # find all files containing text
find . -type f -exec chmod 644 {} \;                   # recursively set 644 permissions to files
find . -type f -perm 0777 -print -exec chmod 644 {} \; # recursively set 644 permissions to files having 777 permissions
find . -type d -perm 777 -print -exec chmod 755 {} \;  # recursively set 755 permissions to directories having 777 permissions
find . -type f -name "vitests.txt" -exec rm -f {} \;   # find and delete delete file vitests.txt
find . -type f -name "*.jpg" -exec rm -f {} \;         # find and delete all jpg files
find . -type f -exec grep -hrn "string" {} \; # only display line contents containing stringInstall windows fonts on ubuntu 18.04 LTS
sudo apt-get update
sudo apt install ttf-mscorefonts-installer #press OK and accept EULA
sudo fc-cache -f -v